
H.B. Fuller delivers high-performance adhesive, sealant, and tape solutions for commercial and metal roofing—innovating products that are code-compliant, environmentally conscious, and designed to save labor while maximizing value.
![]()
![]()
![]()
Unlock the Power of Spray-Applied Canister Adhesives: Proven Tips for Safer, Faster, Smarter Application
Use these field-tested tips to build stronger bonds using spray-applied canister adhesives to work efficiently and keep crews safe in roofing, and construction.
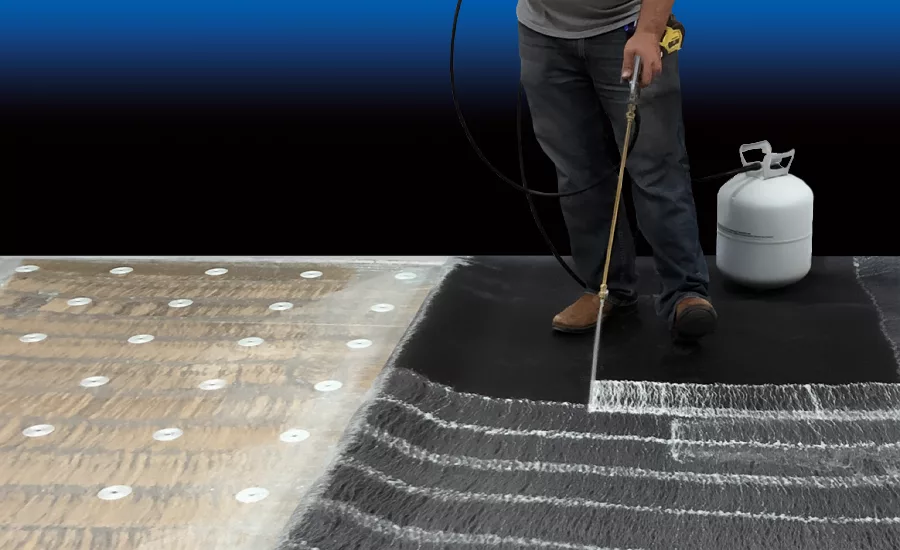
Spray‑applied canister adhesives have become a dependable choice for bonding large surfaces in roofing, construction and manufacturing. They offer fast setup, portable equipment and uniform coverage that can improve workflow and reduce labor strain. To get consistent, high‑quality results, professionals need more than a good product. They need clear preparation steps, disciplined application techniques, reliable maintenance routines and a strong safety culture. This guide summarizes best practices you can use on the job to save time, reduce rework and maintain strong bonds.
What Are Spray‑Applied Canister Adhesives?
These systems combine a pressurized canister, a hose and a spray applicator that delivers adhesive in an even, controlled pattern. Compared with brushing or rolling, a spray approach can speed coverage on wide surfaces, improve ergonomics by reducing bending and reaching, and help teams achieve more uniform adhesive applications. When used correctly, spray canisters provide consistent output and a repeatable process across crews and jobs.
Preparation: Set Yourself Up For Success
Good results start before the first trigger pull. Use this checklist each time you set up.
Canister and Hose Setup
- Attach the hose to the canister valve and the spray applicator. Tighten each connection with a proper wrench.
- Fully open the canister valve, then inspect all connections for leaks before you begin.
Equipment Check
- Confirm the hose and applicator show no damage or wear.
- Ensure the nozzle opening is clear. A clogged tip produces uneven coverage and wastes material.
Shake and Test
- Agitate the canister for about 20 seconds. This step is especially important in cold weather to remix propellant and adhesive.
- Purge air and adhesive into a waste container until flow is steady. Test your pattern on scrap material and adjust the spray width and flow as needed.
Surface Readiness
- Bonding surfaces must be clean, dry and free of dust or debris. Contamination weakens bonds and leads to premature failures.
- If you are bonding porous materials, confirm the specified coverage rate to avoid soak‑in or under‑application.
Temperature and Environment
- Apply only when ambient and substrate temperatures are at or above approximately 40°F (4°C) unless otherwise allowed in the product’s technical data.
- Keep away from open flames and heat sources.
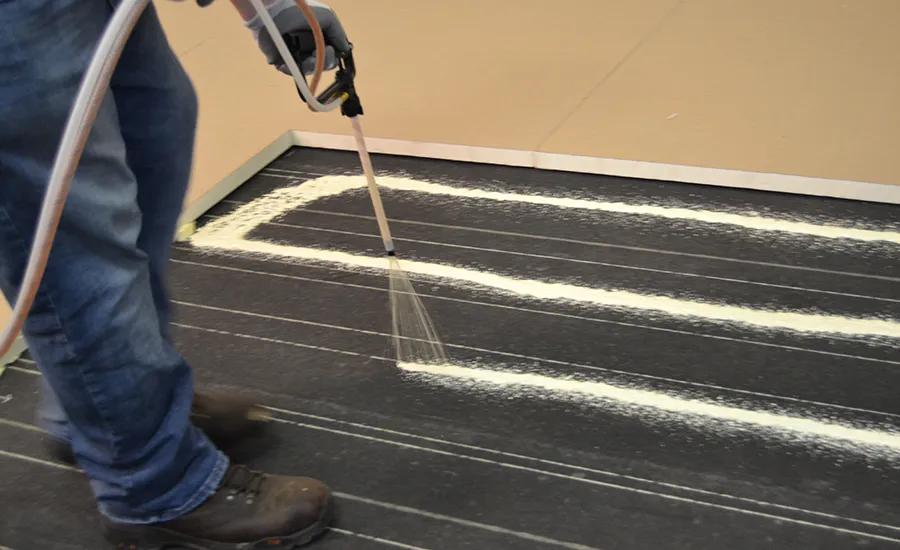
Photo: H.B. Fuller
Application Best Practices
Precision matters. These simple habits improve bond strength and consistency.
Maintain Distance
- Hold the applicator about 6 to 12 inches from the surface for a uniform application.
Use a Uniform Pattern
- Spray in overlapping passes to prevent gaps or over-application. For spatter applications, target 60 to 80 percent coverage as specified so the adhesive contact is complete across the substrate.
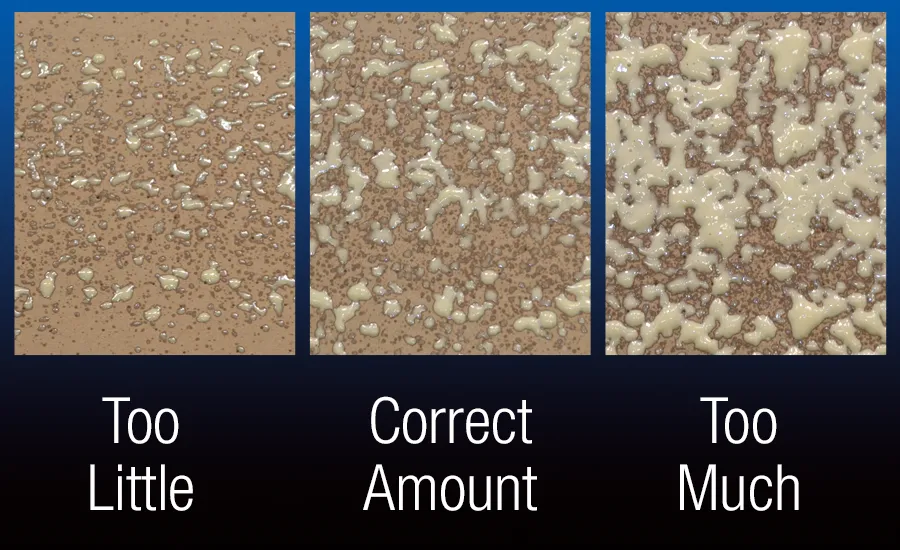
Photo: H.B. Fuller
Apply the Right Amount
- Follow the manufacturer’s coverage rates. Over‑application can slow tack development and trap solvent. Under‑application can reduce bond strength.
Observe Open Time
- Respect the recommended open or tack time before mating surfaces. Joining too soon or too late can compromise adhesion.
Apply Firm Pressure
- Use a weighted roller or mechanical pressure to ensure full contact. Pressure eliminates air pockets and improves the bond line, especially with contact adhesive systems where both surfaces are coated.
Maintenance and Storage
Spray equipment is built to last, but performance depends on routine care and proper storage.
Keep Tips Clean
- After each use, wipe the spray tip with a cloth or nylon brush. A small amount of appropriate cleaning solvent can help remove build‑up.
Between Uses
- The most common blockages happen during downtime. Keep the canister valve open with the hose and applicator attached. Close the applicator using the adjustment nut or safety lock instead of shutting off the canister.
- Every few weeks, purge adhesive through the system for 5 to 10 seconds to refresh material in the line. If you need to shut down for an extended period, use the approved cleaning or flushing kit to clear residual adhesive from the hose and applicator.
Storage Conditions
- Store canisters upright in a covered, well‑ventilated area. Avoid extreme temperatures. Keep products in a controlled range of roughly 59°F to 90°F (15°C to 32°C) or as specified by the technical data sheet.
- Condition canisters at about 70°F (21°C) or higher for 24 hours before use to improve flow and spray quality, especially in cold climates.
- In original, unopened containers stored correctly, many products carry a shelf life of about 12 months. Always confirm with the product’s technical data.
Depressurizing and Disposal
Empty or near‑empty canisters must be depressurized and disposed of in line with local regulations.
Depressurizing Basics
- Purge any remaining material into a waste container.
- Turn off the used canister and depressurize the hose. Disconnect the hose.
- Open the valve and empty residual adhesive and propellant into the waste container. Leave the valve open for at least one hour.
- Locate the pressure release disk at the top of the canister. Use the specified non‑ferrous tool and mallet to strike the disk at its perimeter and remove it, ensuring the container remains depressurized.
- Leave the canister for 24 hours to allow residue to cure before handling for scrap. Follow your site’s safety procedures and consult the safety data sheet before performing this work.
Disposal
- Once depressurized and emptied, canisters may be handled as non‑hazardous scrap in some jurisdictions. Requirements vary. Follow local rules and your organization’s environmental policies.
Safety First
Strong bonds and fast cycles are only useful if work stays safe. Reinforce these reminders with your team.
- Wear appropriate personal protective equipment. This includes gloves, eye protection and protective clothing suited to the material and task.
- Work in ventilated areas and control ignition sources. Adhere to hot work procedures when flammable materials are present.
- Inspect for leaks before use. Replace damaged hoses or fittings. Never use a pressurized canister that shows dents, rust or signs of alteration.
- Read and follow the manufacturer’s directions. Keep the technical data sheet and safety data sheet accessible. Review handling, coverage rates, application temperatures, open times and cleaning instructions before starting a job.
Spray‑applied canister adhesives can increase productivity and deliver dependable bonds when used with disciplined preparation, consistent techniques and smart maintenance practices. Apply these steps on each project to protect your team, reduce rework and achieve reliable results job after job.
Looking for a reprint of this article?
From high-res PDFs to custom plaques, order your copy today!


