Tips for a Watertight Standing Seam Roof

Photo: McElroy Metal.
BOSSIER CITY, La. — Standing seam roof systems are often recognized as the best metal roofing system available. And without a doubt, they offer unparalleled protection when properly specified, manufactured, and installed. Unfortunately, as long as individuals are involved in the process, the potential for mistakes exists.
Over our 60-year history, we’ve seen a lot. Below we share our top tips to ensure a watertight seam for your next standing seam roofing project.
Follow Manufacturer’s Instructions
Adhere to Minimum Slopes: For architects and specifiers, following manufacturer instructions starts by adhering to minimum slope guidelines. While it may not make sense why a panel style that looks only slightly different allows lower slopes, there are reasons.
Recognize Panel Storage is Critical. Most standing seam panels arrive at the jobsite with in-seam sealant in the male and/or female legs. Exposure to extreme temperature swings and contamination from dirt and other foreign materials can cause problems during installation and the seaming operation.
Watch Roof Deck Tolerances. Ensure the roofing structure is within plane tolerances and debris-free before starting installation. While it seems obvious, we see this one often. It’s important to realize that just because you can’t “see” deck imperfections and tolerance issues after panel installation, they can still haunt you.
Follow Placement Guidelines. Most manufacturers also publish detailed installation manuals addressing each component of their system. From tape sealants to tube caulks and outside closure placement and installation, the weather integrity of the roof system relies upon following the manufacturer's instructions.
While it may not be the end of the world to have extra parts left over after assembling some things, a standing seam metal roof isn’t one of them. For example, many systems require structural plates at the eave and ridge. Since they aren’t visible after installation, some contractors find it tempting to skip their use. However, these parts reduce pressure from the crew member standing on the panel during installation. Without these parts, panel deformation and ponding water can occur.
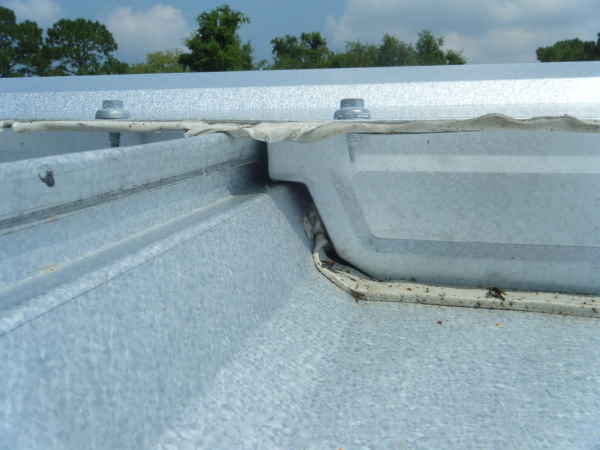
Monitor Module Width. Based on the design, standing seam panels can grow or shrink during installation. Yet to function correctly, the finished install width must be correct. When panels are allowed to grow, it can be tricky (if not impossible) to get them properly sealed and seamed at the low and high sides of a roof, as shown in the photo below.
Respect Panel Style Specifics
In order to achieve a watertight seam, it’s essential to recognize the differences between standing seam styles.
Snap Style Panels: As the name implies, panels that snap together typically have a male/female leg that snaps together during installation. Installers often use a rubber mallet on the vertical leg to ensure the panel is fully engaged. It’s important to note that this family of panels should be engaged (or snapped) continuously from the eave up to the ridge. Skipping the middle portion of the panel and planning to come back to it later frequently causes panel engagement issues.
Mechanically Seamed Non-Symmetrical Hooked Panels. This panel style offers a male/female leg that hooks (or rolls into place) with the preceding panel during installation. The hook leg must be fully and consistently engaged during panel installation.
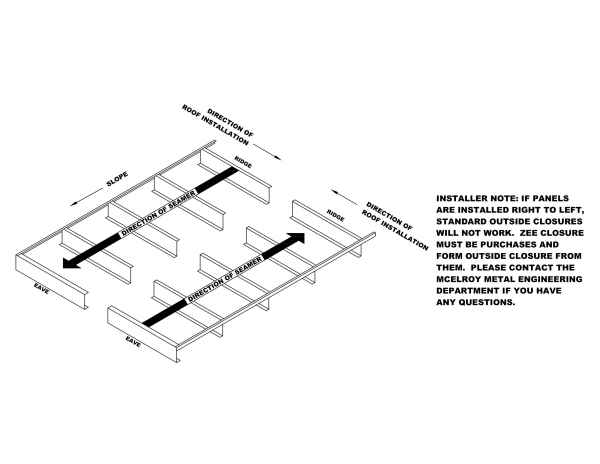
Seaming machine issues will likely occur if the hook leg isn’t engaged. Also, due to the panel design, these panels typically require left-to-right or right-to-left installation.
Mechanically Seamed Symmetrical T-Style Panels. Since T-Style panels are symmetrical, panel installation isn’t limited to a left-to-right format. Instead, installers can start anywhere on the roof, skip over sections and even come back to them later. This panel style also simply pushes together and attaches through the mechanical seaming of a batten cap.
The risk of installer error and seaming machine issues are significantly reduced with T-Style panels. And in rare cases when issues occur, T-Style panels allow for the easy replacement of single panels in the field of the roof. Their non-symmetrical counterparts can’t boast the same.
Regardless of the selected panel style, most manufacturers offer in-seam sealant, which is a critical element in creating a watertight seam.
Seaming Machine Issues
While not every style of standing seam panel requires a mechanical seaming machine, many of the systems used on lower slopes (think 2:12 and below) require mechanical seaming. While seaming machines preform a critical function, it's important to respect the basics below.
Ensure Seamer Maintenance. A seaming machine is a mini roll former and does tremendous work to fold the vertical standing seam panel legs together correctly. As a result, proper maintenance is critical. Most manufacturers send seamers out for maintenance and repair between uses; however, if you decide to purchase a seaming machine, just realize that responsibility falls to you. While maintenance might feel like a waste of time, seaming machine difficulties can wreak havoc on a perfectly well-installed metal roof.
Realize Seamers Aren’t Universal. We mentioned earlier that seaming machines are mini roll formers. As a result, specially designed roll forming wheels fit the male/female legs at specific points as they roll the seam. It’s essential to recognize that seamers are unique to each panel profile and typically cannot be interchanged.
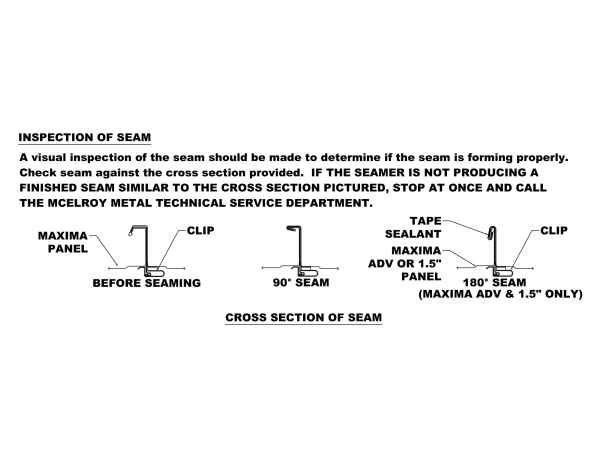
Inspect Before Seaming. Before starting the seaming operation, clearing any dirt, debris, or excess sealant away that might interfere with the seaming operation is essential.
Seam in Proper Direction. Standing seam panels can be either symmetrical or non-symmetrical. As the name implies, non-symmetrical panels look different on each side of the panel, which forces them to install (and seam) in a pre-determined fashion. Always read and follow manufacturer directions to ensure you’re seaming the panels in the proper sequence.
The image below is an excerpt from our Maxima installation manual. Yet other systems, like our 238T can be seamed in either direction or even uphill and downhill. Always read and follow manufacturer instructions to ensure you’re seaming the panels as intended.
Recognize Power Supply is Critical. As mentioned, these machines do significant work in the seaming process, so an adequate power supply is essential. Bad things can happen quickly when a seaming machine doesn’t receive the required power. Always check the power level at the primary power source and the unit's junction to the extension cord before starting any seaming operation.
Pre-Crimping Tools Aren’t Optional. Some systems require a pre-crimping tool a few inches up from the eave and down from the ridge. Other systems also require pre-crimping at each clip location. Due to the different panel and seaming machine nuances, there is no hard and fast rule on pre-crimping. As a result, reading and following the manufacturer's published information is imperative.
Ensure Proper Machine Engagement. Once you’ve placed the seaming machine on the panel, see if the forming wheels and legs are correctly aligned. Once they are, lock the machine into place. Before powering up the machine, check again to ensure that nothing moved during the locking process.
Check The Seam Continuously. Seaming a standing seam roof is not a set it and forget it, autopilot-type operation. The machine may form a seam perfectly for a while only to suddenly stop due to mechanical failure or errors made during panel installation.
Seaming Problems? Stop Immediately. If you encounter issues with seaming, stop seaming and contact the seamer company or the manufacturer. They can likely diagnose and provide a solution to the problem quickly. Seaming additional panels with an incorrectly tuned or broken machine can do irreparable damage to the panel system.
McElroy Metal contracts with Developmental Industries to handle all of the maintenance and troubleshooting for our seamers, so you’re always sure to reach an expert who can provide the best input.
Summary
Mechanically seamed standing seam systems represent one of the best roofing systems currently available. While we’ve mentioned a list of things that can go wrong, installer education makes most of them a moot point. That’s why we place great significance on installer training and certification at McElroy Metal. Click here to learn more about our program and see the current class schedule.