Technical Details: Proper Installation and Repair of EPDM Seams
Ethylene propylene diene monomer (EPDM) has been
on the worldwide commercial roofing market for 40 years. In this time span,
over 1 billion square feet of the material have been installed. The material
has established a proven track record of performance in all climatic
conditions, particularly in field membrane areas.

Ethylene propylene diene monomer (EPDM) has been on the worldwide commercial roofing market for 40 years. In this time span, over 1 billion square feet of the material have been installed. The material has established a proven track record of performance in all climatic conditions, particularly in field membrane areas. The downside of the material has been the inability in some cases to provide consistent seam attachment, which must be treated as a routine maintenance item. Proper inspection, repair and maintenance at EPDM seams can extend the service life of the system.
 Seam
Application
Seam
Application
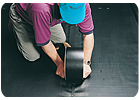
EPDM becomes inert in the vulcanization process. Due to this, the membrane seams cannot be adhered by solvent or heat welding. The proper seam application occurs through the following six steps:
1. Clean the seam surface with a wet rag.
2. Apply primer over the required seam area.
3. Apply seam adhesive over the required seam area in accordance with the membrane manufacturer’s requirements.
4. Allow for proper curing of the seam adhesive.
5. Adhere the seams by mating the surfaces and rolling the completed seams.
6. Apply lap sealant at the edge of the completed seams.
The application of EPDM seams can be troublesome, and seam failure accounts for the majority of problems associated with these systems.
The problems can result from the manufacturing process of the membrane sheets. During manufacturing, talc is applied on the sheet during the vulcanization process to prohibit the sheet from curing on the rollers, which would block the line and impede production. The talc application prohibits the successful adherence of the seams and must be sufficiently cleaned from the membrane surface at seam locations. The cleaning can be completed with a solvent adhesive or white gasoline. Improper cleaning occurs when the talc is not fully removed or simply pushed by the rag cloth from one end of the seam to the other end.
Improper seam application also occurs where the proper adhesive quantities are not applied or when the sheets are adjoined prior to proper curing time. Seam adhesive should be applied at both seam interfaces. All dust particles and trapped air must be removed prior to seam application.
Proper Seam Repair Methods
EPDM seams can be repaired with adhesive or tape. Following are the industry standard repair methods for laps and splices repaired with adhesive.
1. Open laps should be pulled back to a sound part of the seam or splice and any debris removed.
2. If water infiltration is suspected, open the membrane and inspect the insulation and deck for damage. Remove wet or damaged insulation and repair or replace the deck as required. Properly attach new, dry insulation consistent with the thickness of the existing insulation and compatible with the other roof system components.
3. After cleaning the open lap area, the open lap or splice should be glued together with seam adhesive prior to effecting the installation of the patch.
4. To promote thorough adhesion of a patch, it is essential to begin preparing the surface by removing debris, contaminants and ballast from the surface of the membrane or flashing to be repaired. In addition, any field-applied coating must be removed prior to performing repairs to the membrane. The area to be prepared should extend at least 6 inches beyond where the perimeter of the patch will intersect with the existing membrane to provide an ample clean work area to apply a patch.
5. Wash the area with a solution of mild soap (soap containing trisodium phosphate) and water. Scrub with a stiff-bristle brush. Dirt must be removed from the area to be patched. Ensure that the cleaned area extends a minimum of 6 inches beyond the defect.
6. Rinse thoroughly with clean water and allow the membrane to dry. A rubber-bladed squeegee and clean, absorbent, lint-free cloths may be used to facilitate drying.
7. Cut a piece of like membrane large enough to extend 4 inches beyond any part of the defect. Round corners of the patch to prevent peeling of square corners.
8. Thoroughly clean the surface of the membrane to be repaired and the backside of the patch material with a clean, absorbent, lint-free cloth and an acceptable solvent cleaner as required by the membrane manufacturer. If the membrane manufacturer cannot be identified, other solvents such as heptane, unleaded gasoline or xylene may be used. Turn the cloth frequently and replace when dirty to prevent dirt and contaminants from being scrubbed into the membrane. Allow the solvent-wash to thoroughly flash off and dry. The color of the cleaned membrane should be consistent, without streaking.
9. Apply the appropriate manufacturer-recommended primer to both surfaces to be mated and allow to dry per the instructions provided.
10. Apply the proper adhesive to the membrane and the patch per the instructions provided with the adhesive:
11. Allow time for adhesive to dry so that it will not stick or string to the touch of a clean, dry finger. Also, apply pressure to the adhesive film by hand to determine if it has dried throughout its thickness.
12. When the adhesive is ready, mate the two surfaces and smooth out with pressure from a gloved hand. Do not stretch or wrinkle the patch. Roll the patch with a roller to ensure solid contact of the two adhesive films.
13. Apply lap-edge treatment:
15. If ballast has been removed, redistribute the ballast over the exposed area after the seam sealant has skinned over.
 Repairs
With Tape
Repairs
With Tape
The following are the industry standard 12 steps for repairing laps and splices with tape.
1. Open laps or splices should be pulled back to a sound part of the seam or splice and any debris removed.
2. If water infiltration is suspected, cut open the membrane and inspect the insulation and deck for damage. Remove and replace wet or damaged insulation and repair or replace the deck as required. Properly attach new, dry insulation consistent with the thickness of the existing insulation and compatible with the other roof system components.
3. To promote thorough adhesion of a patch, it is essential to begin preparing the surface by removing debris, contaminants and ballast from the surface of the membrane or flashing to be repaired. In addition, any field-applied coating must be removed prior to performing repairs to the membrane. The area to be prepared should extend at least 6 inches beyond where the perimeter of the patch will intersect with the existing membrane to provide an ample clean work area to apply a patch.
4. Wash the area with a solution of mild soap (soap containing trisodium phosphate) and water. Scrub with a stiff-bristle brush. Dirt must be removed from the area to be patched. Ensure that the cleaned area extends a minimum of 6 inches beyond the defect.
5. Rinse thoroughly with clean water and allow the membrane to dry. A rubber-bladed squeegee and clean, absorbent, lint-free cloths may be used to facilitate drying.
6. After the membrane has dried, stir tape primer thoroughly and apply the primer to the membrane with a brush, scrubbing pad or lint-free rag. Prime an area the actual length and width of the repair piece.
7. While the primer is drying, cut a piece of tape cover strip (or flashing) the appropriate size, allowing at least a 3-inch overlap of the area to be repaired.
8. Round the corners of the patch with scissors to prevent peeling of square corners.
9. Peel back the release paper on the back of the tape cover strip and install the cover strip centered over the area to be repaired with the adhesive side turned toward the primed surface. Smooth this patch into place as it is applied, taking care to avoid wrinkles.
10. Apply lap-edge treatment:
12. If ballast has been removed, redistribute the ballast over the exposed area after the seam sealant has skinned over.
Ethylene propylene diene monomer (EPDM) has been on the worldwide commercial roofing market for 40 years. In this time span, over 1 billion square feet of the material have been installed. The material has established a proven track record of performance in all climatic conditions, particularly in field membrane areas. The downside of the material has been the inability in some cases to provide consistent seam attachment, which must be treated as a routine maintenance item. Proper inspection, repair and maintenance at EPDM seams can extend the service life of the system.
Photo
courtesy of GenFlex.
EPDM becomes inert in the vulcanization process. Due to this, the membrane seams cannot be adhered by solvent or heat welding. The proper seam application occurs through the following six steps:
1. Clean the seam surface with a wet rag.
2. Apply primer over the required seam area.
3. Apply seam adhesive over the required seam area in accordance with the membrane manufacturer’s requirements.
4. Allow for proper curing of the seam adhesive.
5. Adhere the seams by mating the surfaces and rolling the completed seams.
6. Apply lap sealant at the edge of the completed seams.
The application of EPDM seams can be troublesome, and seam failure accounts for the majority of problems associated with these systems.
The problems can result from the manufacturing process of the membrane sheets. During manufacturing, talc is applied on the sheet during the vulcanization process to prohibit the sheet from curing on the rollers, which would block the line and impede production. The talc application prohibits the successful adherence of the seams and must be sufficiently cleaned from the membrane surface at seam locations. The cleaning can be completed with a solvent adhesive or white gasoline. Improper cleaning occurs when the talc is not fully removed or simply pushed by the rag cloth from one end of the seam to the other end.
Improper seam application also occurs where the proper adhesive quantities are not applied or when the sheets are adjoined prior to proper curing time. Seam adhesive should be applied at both seam interfaces. All dust particles and trapped air must be removed prior to seam application.
Proper Seam Repair Methods
EPDM seams can be repaired with adhesive or tape. Following are the industry standard repair methods for laps and splices repaired with adhesive.
1. Open laps should be pulled back to a sound part of the seam or splice and any debris removed.
2. If water infiltration is suspected, open the membrane and inspect the insulation and deck for damage. Remove wet or damaged insulation and repair or replace the deck as required. Properly attach new, dry insulation consistent with the thickness of the existing insulation and compatible with the other roof system components.
3. After cleaning the open lap area, the open lap or splice should be glued together with seam adhesive prior to effecting the installation of the patch.
4. To promote thorough adhesion of a patch, it is essential to begin preparing the surface by removing debris, contaminants and ballast from the surface of the membrane or flashing to be repaired. In addition, any field-applied coating must be removed prior to performing repairs to the membrane. The area to be prepared should extend at least 6 inches beyond where the perimeter of the patch will intersect with the existing membrane to provide an ample clean work area to apply a patch.
5. Wash the area with a solution of mild soap (soap containing trisodium phosphate) and water. Scrub with a stiff-bristle brush. Dirt must be removed from the area to be patched. Ensure that the cleaned area extends a minimum of 6 inches beyond the defect.
6. Rinse thoroughly with clean water and allow the membrane to dry. A rubber-bladed squeegee and clean, absorbent, lint-free cloths may be used to facilitate drying.
7. Cut a piece of like membrane large enough to extend 4 inches beyond any part of the defect. Round corners of the patch to prevent peeling of square corners.
8. Thoroughly clean the surface of the membrane to be repaired and the backside of the patch material with a clean, absorbent, lint-free cloth and an acceptable solvent cleaner as required by the membrane manufacturer. If the membrane manufacturer cannot be identified, other solvents such as heptane, unleaded gasoline or xylene may be used. Turn the cloth frequently and replace when dirty to prevent dirt and contaminants from being scrubbed into the membrane. Allow the solvent-wash to thoroughly flash off and dry. The color of the cleaned membrane should be consistent, without streaking.
9. Apply the appropriate manufacturer-recommended primer to both surfaces to be mated and allow to dry per the instructions provided.
10. Apply the proper adhesive to the membrane and the patch per the instructions provided with the adhesive:
- Butyl-based for EPDM.
- Neoprene-based or butyl for neoprene.
- Adhesive manufactured for Hypalon membranes.
- Nitrile-based for ECH.
11. Allow time for adhesive to dry so that it will not stick or string to the touch of a clean, dry finger. Also, apply pressure to the adhesive film by hand to determine if it has dried throughout its thickness.
12. When the adhesive is ready, mate the two surfaces and smooth out with pressure from a gloved hand. Do not stretch or wrinkle the patch. Roll the patch with a roller to ensure solid contact of the two adhesive films.
13. Apply lap-edge treatment:
- For EPDM, neoprene and ECH use lap sealant.
- For Hypalon, use an application of seam sealant.
15. If ballast has been removed, redistribute the ballast over the exposed area after the seam sealant has skinned over.
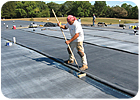
Photo
courtesy of ERA.
The following are the industry standard 12 steps for repairing laps and splices with tape.
1. Open laps or splices should be pulled back to a sound part of the seam or splice and any debris removed.
2. If water infiltration is suspected, cut open the membrane and inspect the insulation and deck for damage. Remove and replace wet or damaged insulation and repair or replace the deck as required. Properly attach new, dry insulation consistent with the thickness of the existing insulation and compatible with the other roof system components.
3. To promote thorough adhesion of a patch, it is essential to begin preparing the surface by removing debris, contaminants and ballast from the surface of the membrane or flashing to be repaired. In addition, any field-applied coating must be removed prior to performing repairs to the membrane. The area to be prepared should extend at least 6 inches beyond where the perimeter of the patch will intersect with the existing membrane to provide an ample clean work area to apply a patch.
4. Wash the area with a solution of mild soap (soap containing trisodium phosphate) and water. Scrub with a stiff-bristle brush. Dirt must be removed from the area to be patched. Ensure that the cleaned area extends a minimum of 6 inches beyond the defect.
5. Rinse thoroughly with clean water and allow the membrane to dry. A rubber-bladed squeegee and clean, absorbent, lint-free cloths may be used to facilitate drying.
6. After the membrane has dried, stir tape primer thoroughly and apply the primer to the membrane with a brush, scrubbing pad or lint-free rag. Prime an area the actual length and width of the repair piece.
7. While the primer is drying, cut a piece of tape cover strip (or flashing) the appropriate size, allowing at least a 3-inch overlap of the area to be repaired.
8. Round the corners of the patch with scissors to prevent peeling of square corners.
9. Peel back the release paper on the back of the tape cover strip and install the cover strip centered over the area to be repaired with the adhesive side turned toward the primed surface. Smooth this patch into place as it is applied, taking care to avoid wrinkles.
10. Apply lap-edge treatment:
- For EPDM, neoprene and ECH, use lap sealant.
- For Hypalon, use an application of seam sealant.
12. If ballast has been removed, redistribute the ballast over the exposed area after the seam sealant has skinned over.
Looking for a reprint of this article?
From high-res PDFs to custom plaques, order your copy today!
.webp?height=740&t=1781278983&width=auto "KEE(2).png")

