Advanced On-Site Roll-Forming Techniques
There are many advantages to running a single-lock standing seam profile through your roll-forming machine. The single-lock profile is clean looking because the ribs are tight. It is efficient, consuming only 3 inches of material for 1-inch-tall ribs (and 4 inches for 11⁄2-inch-tall ribs).

There are many advantages to running a single-lock standing seam profile through your roll-forming machine. The single-lock profile is clean looking because the ribs are tight. It is efficient, consuming only 3 inches of material for 1-inch-tall ribs (and 4 inches for 11⁄2-inch-tall ribs). But the most desirable feature of the single-lock pan profile is its versatility when customizing details. Nowhere is this more evident than in valley construction.
 This article is a study of valley construction using single-lock standing seam panels installed as they are manufactured. Double male and double female panels are used so that valleys can always be built from bottom to top. The valley pans are formed from roof panels made to the full length of the valley run. Roof panels that terminate in valleys are measured and fabricated as they are installed to minimize waste.

Step 2: When the pan is made, hem the female downward facing leg flat against the top of the rib using hand tongs.
 Step 3: Unfold both the female and male ribs so that they stand at 90-degree angles to the panel. (See photo 2.)
Step 4: Bend the legs inward so that they form a slightly open hem on either side of the valley pan.
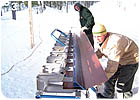
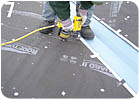
 Step 5: Snap a line down the center of the valley pan and fold the proper angle to fit the valley where it will be applied. Fold half the angle first as you slide the length of the pan through the site break and fold the full angle on the return trip, sliding the valley back through. This will eliminate the potential for leaving kinks or other defects in the finished product. (See photo 3.)
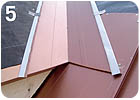
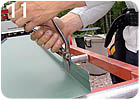
 Step 6: Fit and trim the valley so that it hems around the drip edge or cleat at the bottom and connects evenly with the opposing valley at the top. (See photos 4 and 5.)
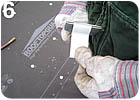
Step 7: Affix the valley pan to the roof deck using standard roofing clips straightened with hand tongs so that they hook into the hem and can be nailed or screwed to the substrate. (See photos 6 and 7.)
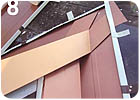 Step 8: To join a ridge cap to adjoining valleys at the peak of a dormer, first cut the center of the ridge cap approximately 1 foot back from the end and bend the two sides to meet the valley at the angle of the main roof plane. Next, trim these two sides so that they tuck under the hems of the adjoining valleys. (See photo 8.)
The final step is to install a "bowtie" cleat that joins the two hems of the opposing valley just over the top of the ridge cap. This cleat is applied over a 1-inch butyl tape or polymer sealant. (See photo 9.)
 To fabricate a double male panel, make a standard roofing panel the length of the roof run (inside the ridge cap to the edge of the drip edge plus 2 inches for the hem and box pan). Unfold the female rib so that it stands at a 90-degree angle to the pan. Then fold the female rib inward so that it faces the opposing male rib at the same plane. (See photos 10-12.)
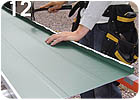
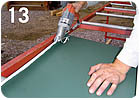
Measure 3⁄8 of an inch across the top of the newly formed male rib, snap a line, and cut off the excess steel with a power shear so that you have identical male ribs facing each other on either side of the roof pan. (See photo 13.)
 Fold a standard box pan at the top end of the panel, apply backer rod (if used), and install the panel with clips on both sides of the pan. The panel must be installed perpendicular to the eave. Hem the bottom of the panel around the drip edge or valley flashing. Now it is possible to work up the valley and out toward the gable end or opposing valley.

The fabricator makes the pan to length and fabricates a box pan on the ridge end. He scribes the cuts on the drop, leaving enough metal to make a full hem but removing enough so that the pan will lie flat in the valley. (See photo 14.)
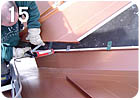
 Step 2: The installer takes the pan and lays it in place, cutting the male and female ribs exactly where they terminate on the valley hem. A pencil line is drawn where the pan will be hemmed and the excess metal is cut so that an even 1-inch hem can be formed. Caulk the top of the valley hem and up the edge of the male leg of the previously applied panel. Install and crimp the pan to the valley hem with tongs. (See photos 15 and 16.)
Pound each panel hem down flat to the valley with a rubber mallet. Don't be afraid to hit the metal hard to get a very flat and sealed hem. (See photo 17.)
Step 1: Make a pan long enough to run from the peak to the longest of the male ribs with a little extra for the hem.
 Step 2: Measure the distance between the male ribs on the top and bottom of the run. Transfer these measurements to the top and bottom of the pan, measuring over from the female rib toward the male. Add the stretch of the female rib configuration (in the case of a 1-inch leg, the stretch is 17⁄8 inches). If necessary, fold down the existing male rib to get more material. Snap a line and cut the pan. Fold an identical female rib in the opposite direction of the existing one using the site break. (See photo 19.)
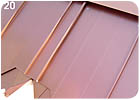 Step 3: Scribe the panel to fit around the valley hems and bowtie cleat, leaving 1 inch extra for folding hems. Seal the tops of the valley hems and bowtie cleat with polymer sealant and hem the panel in the same way as with the other valley pans, making sure to pound the hems flat with the rubber mallet. When the panel is solidly cleated to the valleys and the bow-tie cleat, seam both sides of the double female pan to the male legs of the adjoining pans. (See photo 20.)
The use of double male and female panels is an advanced concept and requires some craftsmanship, but once the crew has become familiar with these details they will not want to return to old methods. The time incurred making these specialty pieces is quickly recovered in the following panels and the quality of the installation is hard to duplicate.
There are many advantages to running a single-lock standing seam profile through your roll-forming machine. The single-lock profile is clean looking because the ribs are tight. It is efficient, consuming only 3 inches of material for 1-inch-tall ribs (and 4 inches for 11⁄2-inch-tall ribs). But the most desirable feature of the single-lock pan profile is its versatility when customizing details. Nowhere is this more evident than in valley construction.
2: Unfold the ribs so that they stand at 90-degree angles to the panel.
3: To fold a valley down the center, snap a chalk line down the center of the valley pan and fold half the angle first as you slide the length of the pan through the site break. Fold the full angle on the return trip, sliding the valley back through.
Preparation
Install roof underlayment, drip edge and primary ridge details before installing the valley pans. When the tops of valleys terminate into a larger roof plane, as in the case of lower gable dormers and ells, install the ridge cap on the dormer after the valley pans are installed. If the bottom of the valley terminates on a roof plane that extends below, the roofing panel below the valley is installed before the valley pan. This roof pan will terminate at the front of the valley; the valley pan will be cleated to it, and the top half of the roofing pan will be applied after the valley is installed.4: The installer fits and trims the valley.
Fabricating and Installing Valleys
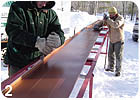
Step 1: Measure the valley from the highest point of the valley pan termination at the peak to the longest point where the valley pan will bend around the drip edge or lower pan cleat. Make a roof panel this long, leaving enough metal to make the hems. (See photo 1.)Step 2: When the pan is made, hem the female downward facing leg flat against the top of the rib using hand tongs.
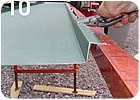
5: The valley should be hemmed around the drip edge or cleat at the bottom and connect evenly with the opposing valley at the top.
Step 4: Bend the legs inward so that they form a slightly open hem on either side of the valley pan.
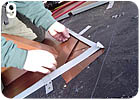
6: A fabricator folds a clip for the valley.
7: The clips for the valley are nailed in place.
Step 7: Affix the valley pan to the roof deck using standard roofing clips straightened with hand tongs so that they hook into the hem and can be nailed or screwed to the substrate. (See photos 6 and 7.)
8: Here the ridge cap is fully installed under the hems.
9: The bowtie cleat joins the two hems of the opposing valley just over the top of the ridge cap.
The final step is to install a "bowtie" cleat that joins the two hems of the opposing valley just over the top of the ridge cap. This cleat is applied over a 1-inch butyl tape or polymer sealant. (See photo 9.)
10: The installer begins fabricating a double male panel from a standard roofing panel.
Use and Fabrication of Double Male Panels
A double male panel is used when applying roofing panels in both directions across a roof plane. On a large run, you may want to run two installation crews for one fabricator. A good fabricator can usually keep up with two crews, especially if he has a runner to bring panels to the installers and to help with the application of backer rod (if used). A more common use for the double male panel is to orient roofing applications between two valleys so that both valleys are applied from the bottom upwards and terminated at the top.11: Unfold the female rib so it stands at a 90-degree angle to the pan.
12: Then fold the rib inward so that it faces the opposing male rib.
Measure 3⁄8 of an inch across the top of the newly formed male rib, snap a line, and cut off the excess steel with a power shear so that you have identical male ribs facing each other on either side of the roof pan. (See photo 13.)
13: Cut off the excess steel from the newly formed male rib with a power shear.
14: The fabricator scribes the cuts on the drop, leaving enough metal to make a full hem.
Installing Roof Pans in a Valley
Step 1: When installing roofing panels in a valley, work from the bottom upward with the male rib in. The installer calls long point measurements for the female rib and tells the fabricator roughly how much to drop from this measurement for the male leg side.15: The installer caulks the top of the valley hem and the leg.
The fabricator makes the pan to length and fabricates a box pan on the ridge end. He scribes the cuts on the drop, leaving enough metal to make a full hem but removing enough so that the pan will lie flat in the valley. (See photo 14.)
16: The pan is installed and the hem is squeezed closed with tongs.
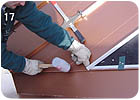
17: Finally, the hem is hammered tight with a mallet.
Pound each panel hem down flat to the valley with a rubber mallet. Don't be afraid to hit the metal hard to get a very flat and sealed hem. (See photo 17.)
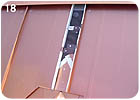
18: The two male leg panels need to be joined with a double female panel.
Making a Double Female Roof Pan
When roof panels are run up both sides of the opposing valleys, there will be two roof pans with male ribs facing opposite directions. These two pans will need to be joined together with a double female ribbed pan. (See photo 18.)Step 1: Make a pan long enough to run from the peak to the longest of the male ribs with a little extra for the hem.
19: Here the fabricator prepares the second female rib on the double female panel.
20: When the panel is solidly cleated to the valleys and the bow-tie cleat, both sides of the double female pan are connected to the male legs of the adjoining pans.
The use of double male and female panels is an advanced concept and requires some craftsmanship, but once the crew has become familiar with these details they will not want to return to old methods. The time incurred making these specialty pieces is quickly recovered in the following panels and the quality of the installation is hard to duplicate.
Links
Looking for a reprint of this article?
From high-res PDFs to custom plaques, order your copy today!
.webp?height=740&t=1781278983&width=auto "KEE(2).png")


