TechnicalDetails: Roof Edge Repairs
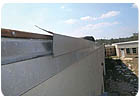
The perimeter edge is one of the most vulnerable points of a low-slope roof system. This area is continually susceptible to wind-uplift damage and moisture infiltration.
The perimeter edge is one of the most vulnerable points of a low-slope roof system. This area is continually susceptible to wind-uplift damage and moisture infiltration. Deterioration also occurs due to the fact that the membrane interacts with metal, which can create openings from differential movement and loss of adhesion between the membrane and the metal. During the course of a roof's service life, repairs are often required at these locations. The type of membrane that is employed on the roof largely determines the types of repairs that are completed.
The metal component should be inspected for deterioration and deformations. All deteriorated metal (openings, severe corrosion, displaced sections, etc.) should be removed and replaced in kind. In some cases, the wood blocking should also be examined for loss of structural integrity created by moisture absorption or wood rot. These substrate deformations lead to loss of attachment of the metal component and flashing material. Lightly corroded metal can remain in place if it is properly repaired. Proper repairs include removing the corrosion by wire brushing the surface and applying a proper primer and - if required - a corrosion-resistant paint.
All loose, backed-out and displaced fasteners should be resecured to the solid blocking or the substrate. Due to the fact that perimeter metal is susceptible to wind damage, proper fasteners are required for adequate attachment. If the metal is anchored to wood blocking, attachment should be completed with annular ring or threaded nails that are applied within 1 inch of the previous nail. The nails should be applied in a staggered pattern at a rate that is in accordance with the perimeter fastening calculations that are completed for the specific facility.
Fiberglass felt flashings can be applied in hot asphalt or a flashing-grade adhesive. If hot asphalt (Type III or Type IV) is used in the repair procedure, the application temperature must be within the acceptable EVT requirements. If modified bitumen is used, application can be completed using one of four application methods depending on the type of modified sheet: torch, self-adhered, hot asphalt or cold application.
The first ply of flashing must extend a minimum of 6 inches beyond the repair area and each additional ply must extend 3 inches beyond that. Once the flashing has been properly repaired, the existing surfacing - coating or aggregate - can be reapplied over all exposed felts.
The repair material shall be a matching thermoplastic membrane that is cut to extend a minimum of 4 inches beyond the defective area. The corners of the membrane patch should be rounded to prevent future membrane peeling that often occurs with square corners.
The membrane patch is welded in place using three thermoplastic welding steps: tack weld, pre-weld and final weld. The tack weld is used to hold the membrane patch in place to prevent wrinkling during installation. Pre-weld is conducted by inserting the hot air nozzle under the patch and in approximately two inches from the edges. This weld prevents heat leakage from occurring during the final weld process. The final weld is completed at the unadhered outer edges (2 inches). The material is immediately rolled in place with a hand roller to adhere the membrane as it is welded.
Once the welds have been completed, the seam adhesion can be checked for voids with a rounded tip probe or a screwdriver. All open seams must be rewelded. Seal the seams of reinforced thermoplastic membrane patches with a compatible sealant. Finally, redistribute any removed ballast over the exposed area.
Repairs with tape are completed by cutting the tape cover strip to the required repair size, allowing for a minimum overlap of the repair area of 3 inches. The corners of the tape should be rounded to prevent future membrane peeling that often occurs with square corners. Repairs are relatively simple using this method. Simply remove the release film from the bottom of the tape, center the tape over the patch area and apply the tape.
Repairs with adhesive must be completed in accordance with the membrane manufacturer's requirements. Proper adhesive applications rates are required for the long- term success of the repairs. Another important criterion is to use the proper adhesive for the membrane repair materials:
For each repair method, roll the completed repair application in all directions with a rubber roller to achieve full adhesion. If the membrane is EPDM, neoprene or ECH, then lap sealant should be applied at the perimeter of the patch. If the membrane is Hypalon, apply seam sealant at the perimeter of the patch. Finally, redistribute any removed ballast over the exposed area.
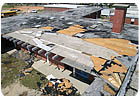
Studies revealed the damage to this Pensacola school building during a hurricane began at the roof's perimeter edge. (Photo courtesy of RICOWI.)
The perimeter edge is one of the most vulnerable points of a low-slope roof system. This area is continually susceptible to wind-uplift damage and moisture infiltration. Deterioration also occurs due to the fact that the membrane interacts with metal, which can create openings from differential movement and loss of adhesion between the membrane and the metal. During the course of a roof's service life, repairs are often required at these locations. The type of membrane that is employed on the roof largely determines the types of repairs that are completed.
Metal Edge Repairs
There are basic repairs required to the metal edge component no matter what type of membrane is applied. Repairs at these locations should be completed using materials and configurations similar to the existing construction. If repairs are localized, then all deteriorated metal (torn, cut, unbonded, split, etc.) should be removed.The metal component should be inspected for deterioration and deformations. All deteriorated metal (openings, severe corrosion, displaced sections, etc.) should be removed and replaced in kind. In some cases, the wood blocking should also be examined for loss of structural integrity created by moisture absorption or wood rot. These substrate deformations lead to loss of attachment of the metal component and flashing material. Lightly corroded metal can remain in place if it is properly repaired. Proper repairs include removing the corrosion by wire brushing the surface and applying a proper primer and - if required - a corrosion-resistant paint.
All loose, backed-out and displaced fasteners should be resecured to the solid blocking or the substrate. Due to the fact that perimeter metal is susceptible to wind damage, proper fasteners are required for adequate attachment. If the metal is anchored to wood blocking, attachment should be completed with annular ring or threaded nails that are applied within 1 inch of the previous nail. The nails should be applied in a staggered pattern at a rate that is in accordance with the perimeter fastening calculations that are completed for the specific facility.
All deteriorated or damaged perimeter edge metal should be removed and replaced.
Built-Up Roof Repairs
Gravel stops or drip edges on built-up roof membranes are typically stripped in with a multi-course of fabric and adhesive or modified bitumen flashing. The repaired flashing must be installed in the exact configuration and type as the existing flashing. A minimum of two plies is required.Fiberglass felt flashings can be applied in hot asphalt or a flashing-grade adhesive. If hot asphalt (Type III or Type IV) is used in the repair procedure, the application temperature must be within the acceptable EVT requirements. If modified bitumen is used, application can be completed using one of four application methods depending on the type of modified sheet: torch, self-adhered, hot asphalt or cold application.
The first ply of flashing must extend a minimum of 6 inches beyond the repair area and each additional ply must extend 3 inches beyond that. Once the flashing has been properly repaired, the existing surfacing - coating or aggregate - can be reapplied over all exposed felts.
Modified Bitumen
Modified bitumen flashing repairs are completed with a single layer of modified bitumen flashing material. The modified bitumen flashing material can be applied in hot asphalt (SBS only), cold adhesive or torch application. The sheet must extend a minimum of 6 inches onto the adjoining roof membrane surface. To ensure sufficient adhesion of the repair, apply pressure to the repair material.Thermoplastic Materials
An important element of thermoplastic repair is proper adhesion of the repair material to the existing surface. This can only be achieved through adequate preparation of the existing surface. All dust, dirt, debris and contaminants must be thoroughly cleaned from the surface. This can be accomplished with a cleaning solution consisting of detergent and warm water. A stiff brush should be used to scrub the membrane prior to rinsing the membrane of all solutions. Drying the membrane surface should be completed with a lint-free cloth. When the surface has been sufficiently cleaned, the membrane in the affected repair area should be wiped with an approved solvent (such as acetone), which is applied with a lint-free cloth to promote bonding of the repair material to the membrane.The repair material shall be a matching thermoplastic membrane that is cut to extend a minimum of 4 inches beyond the defective area. The corners of the membrane patch should be rounded to prevent future membrane peeling that often occurs with square corners.
The membrane patch is welded in place using three thermoplastic welding steps: tack weld, pre-weld and final weld. The tack weld is used to hold the membrane patch in place to prevent wrinkling during installation. Pre-weld is conducted by inserting the hot air nozzle under the patch and in approximately two inches from the edges. This weld prevents heat leakage from occurring during the final weld process. The final weld is completed at the unadhered outer edges (2 inches). The material is immediately rolled in place with a hand roller to adhere the membrane as it is welded.
Once the welds have been completed, the seam adhesion can be checked for voids with a rounded tip probe or a screwdriver. All open seams must be rewelded. Seal the seams of reinforced thermoplastic membrane patches with a compatible sealant. Finally, redistribute any removed ballast over the exposed area.
Thermosets (EPDM)
Thermoset repairs can be completed by two methods: repair with adhesive or repair tape application. Preparation and cleaning of the surface is as critical with thermoset materials as it is with thermoplastics. Thoroughly wash the membrane surface prior to either repair application method in the same manner as thermoplastic cleaning. Proper priming of the surface is required prior to the membrane repair application.Repairs with tape are completed by cutting the tape cover strip to the required repair size, allowing for a minimum overlap of the repair area of 3 inches. The corners of the tape should be rounded to prevent future membrane peeling that often occurs with square corners. Repairs are relatively simple using this method. Simply remove the release film from the bottom of the tape, center the tape over the patch area and apply the tape.
Repairs with adhesive must be completed in accordance with the membrane manufacturer's requirements. Proper adhesive applications rates are required for the long- term success of the repairs. Another important criterion is to use the proper adhesive for the membrane repair materials:
- EPDM: butyl-based adhesive.
- Neoprene: neoprene or butyl-based adhesive.
- Hypalon: adhesive manufactured for Hypalon or hot air welding.
- ECH: nitrile-based adhesive.
For each repair method, roll the completed repair application in all directions with a rubber roller to achieve full adhesion. If the membrane is EPDM, neoprene or ECH, then lap sealant should be applied at the perimeter of the patch. If the membrane is Hypalon, apply seam sealant at the perimeter of the patch. Finally, redistribute any removed ballast over the exposed area.
Links
Looking for a reprint of this article?
From high-res PDFs to custom plaques, order your copy today!
.webp?height=740&t=1781278983&width=auto "KEE(2).png")

