Use Thermography for Picture-Perfect Roof Inspections

Infrared roof inspections can help roofing contractors work smarter and be heroes to their customers by pinpointing wet, failed areas of a roof. Repairs are cheaper and faster than replacement. As a rule of thumb, repair the problem areas if less than 30 percent of the total area of the roof has failed; tear off and replace the entire roofing system if more than 30 percent has failed.
Other benefits of thermography to roofing contractors include the creation of a post-installation inspection record showing the as-built condition of the new roofing system, as well as a means of expanding services. Some contractors offer thermography inspection services to their clients as a predictive maintenance service. Periodic IR roof inspections can identify problems before they become serious. Other contractors and consultants use speculative fly-over surveys to locate problem roofs and then use the evidence to sell their services to the building owners.

How Does it Work?
Thermography enables us to see and measure heat. All materials on earth emit heat energy in the IR portion of the spectrum. Unfortunately, the unaided human eye cannot see in the IR. However, IR cameras can not only see, but also record infrared images and measure the temperatures of objects and areas of objects quite accurately. Real-time imaging allows the user to see the infrared image displayed as the camera is moved, like a viewfinder.Thermography can pinpoint leaks in roofing and other building envelope inspections by exploiting the thermal properties of water. Water stores heat very well; it warms up or cools down more slowly than other materials common in buildings. This property is called “specific heat” by physicists.
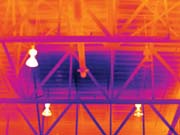
Thermography measures and compares the temperatures of roofing substrate materials that are wet — presumably from leaks — and roofing substrate that is dry. The dry roof areas cool faster after sunset and warm up faster than the wet areas after sunrise. This causes a temperature difference that can be imaged. The practice is addressed by the American Society for Testing & Materials in measurement standard C1153, “Location of Wet Insulation in Roofing Systems Using Infrared Imaging.” It can also be used to inspect the underside of roof decks, a highly effective approach when working with metal and ballasted roofing systems, which are difficult or impossible to inspect from above (Figure 4).
Think the Science!
To do good thermography, you must be aware of the science behind what you’re imaging. Differences in temperatures within roofing components are affected by temperatures inside the building and by ambient conditions including sunlight intensity and duration, wind, air temperature, and sky conditions — whether clear, partly cloudy, or overcast.For example, faulty, missing, or compressed insulation can allow warmth from inside the building to heat the roofing membrane. Such conditions can falsely suggest the presence of wet insulation.
Thermal imaging in the winter and in northern latitudes presents significant challenges, because all building surfaces are cooled by high winds, low air temperatures, and weak insulation from the sun. As a result, temperature differences between wet and dry areas of a frigid roof can be less than 1 degree F. Contrast that to typical warm summer conditions, when temperature differences between the same wet and dry areas can be as high as 20 degrees F or more! According to ASTM C1153, the survey should not be conducted unless winds are less than 25 km/hr (<16 mph), and on heavy overcast days, the roof surface should be least 10 degrees C cooler than under the roof deck.
Ballasted and metal roofs present special challenges. Stone ballast or full-coverage pavers on ballasted roofing systems present a large thermal mass and generally cannot be inspected from above. Metal roofing radiates infrared poorly and is a very good infrared reflector, so external IR measurements are difficult to take. In both these cases, a thermographic inspection may be possible from inside the building, if the underside of the roof deck is accessible.
How Do You Conduct an IR Roof Survey?
Assuming there is a roof leak, the objective of a thermographic inspection is to identify wet substrate materials, typically insulation. Remember, leaks, which are the source of the moisture in substrate materials, may be very difficult to locate and many feet away from the moisture.
Inspections may be walk-overs (inspections performed by personnel walking on the roof), walk-unders (inspections performed by personnel looking up at the deck from below), and/or fly-overs (using an aircraft). Each has its advantages and disadvantages. This article addresses walk-overs and walk-unders.
Walk-overs
Inspections on the roof should be performed during the early evening hours, beginning about an hour after sunset. A wide-angle lens is often employed to gather a larger view of the surface. A systematic zigzag approach assures that the entire surface is inspected. Walk-overs obviously require access to the roof and the concomitant need to carry equipment up ladders and stairways. When on the roof, access to high points, such as elevator shaft monitors, can be very helpful.Walk-unders
Seen from below, leaks often may be traced to their source, as water can sometimes be seen running through the deck channels. Walk-unders allow inspection of metal roofs and ballasted roofs, which are difficult or impossible to image from above. They can be performed in virtually any weather conditions. They should be performed during the morning, when the sunshine on the dry roof causes it to heat faster than the wet sections — just the opposite of the walk-over conditions. The acquired thermal images can then be transferred to a structural drawing to help locate likely leak sources topside. A telephoto lens is often helpful.Pre-inspection Considerations
Thermographic inspection works best when the differences in the temperatures of wet and dry roofing system components are greatest. This typically occurs about an hour after sundown. Alternatively, inspections can be performed during the early sunlight hours of the morning, but for a number of reasons, nighttime results are generally better. ASTM C1153 states that inspections can be conducted starting one hour after sunset, but in actual practice, the best images might not be obtained for three or four hours after sunset. Check image quality on the roof for early indications starting one hour after sunset. Changes in temperature occur more rapidly under cloudless conditions.Prior to inspection, no appreciable precipitation should have occurred for at least 24 hours. The roof should be free of ice, snow and ponded water (small areas are acceptable but are not inspectable). Frost and dew will form on the cooler sections (dry) before they do on the warmer sections (wet). You can let nature confirm your findings when this happens!
It is very important to inform building security and the local police department before you walk the roof. It’s the best way to avoid surprise interruptions in case you set off an intrusion alarm, or a neighbor calls police with a “suspicious person” report!
Safety is Vital
Walking a roof at night is inherently dangerous, so be sure to first visually inspect the roof in daylight to determine if fall protection is required. Remove any obstructions or trip hazards. Flag any guy wires, antennas and other obstacles. Inspect the underside of the roof for structural integrity prior to walking on it. Note any atriums.If the facility is OSHA compliant, be aware of 29 CFR 1926.501, “Duty to Have Fall Protection.” Never go on a roof alone. A minimum of two people should be on a roof at all times, preferably three or more, and each should have a cell phone or radio available in case of emergency. Avoid stepping on blisters that are common on built up bitumen and gravel roofs. They may hide a nasty surprise!
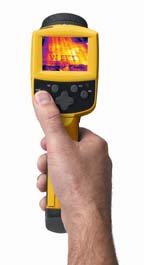
Worker safety is a primary concern for all roofing professionals and the tools used by these professionals need to increase safety, not increase any hazards. When shopping for an IR camera, it’s important for the buyer to focus on “portability.” The camera must be small, lightweight, rugged and easy-to-carry. It should have a built-in LCD display and not a separate video monitor that would require additional equipment and cables that decrease safety when ladders and stairs have to be climbed.
General Walk-over Inspection Procedure
Conduct a wide-area scan first, to confirm that the “inspection window” is open and good quality images can be obtained. Then systematically walk the roof. Inspect all parapets, walls and seams. Look around drains, scuppers, HVAC units, exhaust vents, etc. Leaks can occur near seams, penetrations, drains, and punctures. The tendency is to think that all roofs are clean of equipment and easy to inspect. Unfortunately, that is rarely the case. Conduits, pipes, exhaust vents, HVAC and drains limit the area that can be inspected. Temporary equipment may also be encountered. Photo document all of this.If you locate an anomaly — an unusually warm area — on a ballasted roof, be sure that the anomaly is not caused by excess ballast. A sampling of the insulation may be necessary to determine exactly what you have—the records on the last roof construction may be lost or unattainable. Insulation that has a high ability to absorb water will stay wet for a very long time. Insulation that drains freely may yield a thermal indication only for a few hours after precipitation.
Confirm wet areas by using a destructive or non-destructive method. Only non-penetrating methods should be used on single membrane roofs. Penetrating methods, such as core cuts or moisture probe readings, can be used on built-up roofs provided the test holes are repaired afterwards. A moisture probe requires that one or two small holes be drilled through built-up roof surfaces. The moisture probe is inserted, the moisture reading taken and recorded, and the holes filled with roof mastic.
Outline all confirmed anomalies with paint and number them sequentially. Take a visible photo of the anomaly during the following day if required. Take good notes describing the location and nature of each finding.
Report Your Findings
Determine the requirements of your reporting. There are three general reporting levels.No documentation: This is the quickest report to perform. The client simply sees the wet areas marked on the roof. You may or may not be asked to include verification of wet areas by destructive or non-destructive methods such as cores or the use of moisture instrumentation. It is wise to take photographs of marked wet areas from several angles. If a post-repair inspection is contracted, locating the exact spots of the repair without photos may be difficult.
Formal report: Contents of a written formal report can vary, but generally include both IR and visible images to document findings and details on leak verification methods. Each wet area should be clearly marked, and locations and results of verification clearly identified.
Detailed report: Includes everything included in a formal report plus the location of findings on a structural drawing of the building, which may involve structural engineering input. Calculate the total area of indications to be repaired.
Lessons Learned
Training and certification in the use of an IR camera is absolutely mandatory. Maintain a Level I or II of certification in infrared thermography. Excellent courses in thermography are offered by camera manufacturers.Certain materials such as EPDM may be difficult to inspect because it is 10 times more efficient at reflecting thermal energy from above than it is at emitting it. Inspect these roofs — if this is a problem — after the hottest days and preferably when clouds are present.
Return to the roof the following day to record visual images and bring your IR camera with you. You never know!
Purchase professional liability insurance — also known as “E&O” (Errors and Omissions).
Know and adhere to any local safety standards.
Hire a lawyer to write boilerplate for your contracts. Do not over-represent yourself or the information you provide.
It is very, very hard to gain a loyal customer.
It is very, very easy to lose them.
Conclusion
By utilizing thermography as a proactive maintenance tool, it is possible to increase the service life of the roof while reducing overall maintenance costs. The effectiveness of a thermographic inspection program will depend upon the quality of the data obtained from the IR inspection as well as the quality of the repairs. There is no substitute for good training and extensive field experience using an IR camera. The ultimate value of the inspection program is to minimize the cost of repairs and its success will depend largely upon the condition of the roof when the program is launched. To maximize their value, IR inspections should be implemented before the roof begins to leak — ideally soon after installation and at least annually thereafter.Looking for a reprint of this article?
From high-res PDFs to custom plaques, order your copy today!
.webp?height=740&t=1781278983&width=auto "KEE(2).png")


