Ventilating Problem Areas
While building codes differ from municipality to municipality, many codes now mandate intake and exhaust ventilation for attics. It’s easy to see why. A properly ventilated attic can save on energy usage and rid the home of excess moisture, preventing mold and mildew.

While building codes differ from municipality to municipality, many codes now mandate intake and exhaust ventilation for attics. It’s easy to see why. A properly ventilated attic can save on energy usage and rid the home of excess moisture, preventing mold and mildew. It can also reduce thermal transfer to the living area in summer and prevent ice damming in winter. And, by minimizing heat buildup in the attic, proper ventilation can even prolong the life of the roof system.
Industry experts agree that a balanced system - with intake ventilation meeting or exceeding exhaust ventilation - is ideal, and this is commonly achieved with soffit vents for intake ventilation and a ridge vent for exhaust ventilation.
 Unfortunately,
in many reroofing situations, common structural elements can make installing a
proper ventilation system problematic. Houses without overhangs can make the
installation of soffit vents impossible, and existing soffit vents can be
blocked by insulation. Residences with shed walls and dormer peaks can make it
difficult to install a standard ridge vent. However, according to Steve Henderson
of DCI Products, all of these problem areas can be properly vented with the use
DCI Products’ solution: the SmartVent.
Unfortunately,
in many reroofing situations, common structural elements can make installing a
proper ventilation system problematic. Houses without overhangs can make the
installation of soffit vents impossible, and existing soffit vents can be
blocked by insulation. Residences with shed walls and dormer peaks can make it
difficult to install a standard ridge vent. However, according to Steve Henderson
of DCI Products, all of these problem areas can be properly vented with the use
DCI Products’ solution: the SmartVent.
Henderson points out that in the last 30 years or so, there have been significant changes in the way homes are constructed that have had a direct impact on the ventilation of existing homes. As saving energy has become more important, advances like replacement windows, airtight doors, and Tyvek house wrap have helped homeowners cut utility costs. “Houses are a lot tighter,” Henderson said. “It’s a good thing for energy efficiency, but it increases the need for ventilation in the attic.”
While ridge vents are increasingly common in reroof situations, they won’t be effective without intake ventilation at the eaves, cautions Henderson. “We explain it this way: It’s like sucking on one end of a straw with your finger over the other end,” he said. “You need proper intake ventilation, and that’s why my father invented and patented the SmartVent.”
Henderson pointed out that ventilation problems aren’t restricted to older homes, and they can crop up even in new construction. “There’s often a lack of communication between the various trades,” he said. “The siding guys might do the siding and install a perforated soffit, but the insulation contractor sprays insulation over the soffit. The roofing contractor thinks there’s sufficient intake ventilation, and there’s none. With SmartVent, you’re bypassing the area that can be blocked with insulation, so it allows the contractor to guarantee the roof and keeps the roofer on the roof.”
The tapered, corrugated plastic vent installs under the shingles and can be used for both intake and exhaust ventilation. (See Figure 1.) “The goal was to make installation easy for the contractor,” said Henderson. “It’s easy to install, and it’s useful in a variety of applications.”
According to Henderson, the most popular usage of the SmartVent is at the lower eaves edge for intake ventilation in cases where there are no overhangs. “Consider a typical Cape Cod with no intake ventilation and no overhang,” he said. “The ridge vent is easy, but the intake ventilation can be a problem. Our product was designed to provide the solution.”
Another common situation that makes it difficult to install intake ventilation is a bungalow with overhangs and open, exposed rafters. Here insulation often covers any soffits, so the vent can be installed mid-roof, just above the blocked area, providing unobstructed airflow to the ridge. (See Figure 2).
SmartVent has a rating of 9 inches of net free area (NFA). With the product on both sides of the roof, that equals 18 inches of net free area, which is the exact rating of the company’s SmartRidge II ridge vent. (See Figure 3.)“This ensures a balanced system,” said Henderson, who noted that intake ventilation should meet or exceed the exhaust ventilation. “You don’t have to be perfect,” he said. “You can have more intake, but not more exhaust.”
Installation is easy, according to Henderson. “After you put the drip edge on, like you always do, measure up 6 inches from the drip edge,” he said. “Cut a 1-inch slot in the roof deck from 6 inches to 7 inches from the drip edge and put the SmartVent down.”
After installing ice shield over the SmartVent, the starter strip can be installed and the shingles can be applied as usual.
“You don’t want to damage the siding, and if a window is sitting on the roofline, you don’t want to risk creating a leak,” said Henderson. The product provides options for the contractor in installation, so it can be installed at the highest possible point. (See Figures 4 and 5.)
The SmartVent has a hinge at the 6-inch mark to allow it to fit in various applications.
“It’s the hinge in the product that is so key,” said Henderson. “That’s what’s so great - the versatility of the product.”
“Often one side of the roof can be raised to a pitch as low as 1:12 or 2:12, but whether you’re covering that section with rubber or asphalt, the low side of the SmartVent can be roofed over or ice shield can be installed over it,” he said. “You can run the rubber roof over the SmartVent to guarantee a watertight roof. It’s a nice, clean look - better than box vents or power fans. And SmartVent is green - it doesn’t use electricity, it takes less labor to install, and it increases energy efficiency, saving customers on their utility bills.”
The vent in this case is single-sided, but it siphons air from both sides of the roof, providing between 12 inches to 15 inches NFA, depending on some variables.
In these cases, the vent should be installed on both sides of the ridge, noted Henderson, who recommends installing the ridge cap and positioning the SmartVent below the top course of shingles. (See Figure 7.) “It should be at the highest point possible for full and continuous exhaust,” he said. “At the eave, it should be installed at the lowest point possible; at the ridge, it should be installed at the highest point possible.”
For more information, visit www.dciproducts.com.
While building codes differ from municipality to municipality, many codes now mandate intake and exhaust ventilation for attics. It’s easy to see why. A properly ventilated attic can save on energy usage and rid the home of excess moisture, preventing mold and mildew. It can also reduce thermal transfer to the living area in summer and prevent ice damming in winter. And, by minimizing heat buildup in the attic, proper ventilation can even prolong the life of the roof system.
Industry experts agree that a balanced system - with intake ventilation meeting or exceeding exhaust ventilation - is ideal, and this is commonly achieved with soffit vents for intake ventilation and a ridge vent for exhaust ventilation.
Figure 1
Henderson points out that in the last 30 years or so, there have been significant changes in the way homes are constructed that have had a direct impact on the ventilation of existing homes. As saving energy has become more important, advances like replacement windows, airtight doors, and Tyvek house wrap have helped homeowners cut utility costs. “Houses are a lot tighter,” Henderson said. “It’s a good thing for energy efficiency, but it increases the need for ventilation in the attic.”
While ridge vents are increasingly common in reroof situations, they won’t be effective without intake ventilation at the eaves, cautions Henderson. “We explain it this way: It’s like sucking on one end of a straw with your finger over the other end,” he said. “You need proper intake ventilation, and that’s why my father invented and patented the SmartVent.”
Henderson pointed out that ventilation problems aren’t restricted to older homes, and they can crop up even in new construction. “There’s often a lack of communication between the various trades,” he said. “The siding guys might do the siding and install a perforated soffit, but the insulation contractor sprays insulation over the soffit. The roofing contractor thinks there’s sufficient intake ventilation, and there’s none. With SmartVent, you’re bypassing the area that can be blocked with insulation, so it allows the contractor to guarantee the roof and keeps the roofer on the roof.”
Figure 2
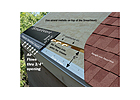
No Overhang, No Problem
Henderson’s father, Jack, was a general contractor who did a lot of roofing work. “He saw the void in the industry,” said Henderson. “In many cases, houses had no intake ventilation at all, with the exception of some gable vents, which only covered the top third of the attic. He knew a product designed for the lower roof edges would be effective, and since the SmartVent tapers, it blends into the roof.”The tapered, corrugated plastic vent installs under the shingles and can be used for both intake and exhaust ventilation. (See Figure 1.) “The goal was to make installation easy for the contractor,” said Henderson. “It’s easy to install, and it’s useful in a variety of applications.”
According to Henderson, the most popular usage of the SmartVent is at the lower eaves edge for intake ventilation in cases where there are no overhangs. “Consider a typical Cape Cod with no intake ventilation and no overhang,” he said. “The ridge vent is easy, but the intake ventilation can be a problem. Our product was designed to provide the solution.”
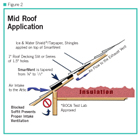
Another common situation that makes it difficult to install intake ventilation is a bungalow with overhangs and open, exposed rafters. Here insulation often covers any soffits, so the vent can be installed mid-roof, just above the blocked area, providing unobstructed airflow to the ridge. (See Figure 2).
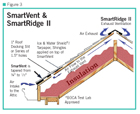
SmartVent has a rating of 9 inches of net free area (NFA). With the product on both sides of the roof, that equals 18 inches of net free area, which is the exact rating of the company’s SmartRidge II ridge vent. (See Figure 3.)“This ensures a balanced system,” said Henderson, who noted that intake ventilation should meet or exceed the exhaust ventilation. “You don’t have to be perfect,” he said. “You can have more intake, but not more exhaust.”
Installation is easy, according to Henderson. “After you put the drip edge on, like you always do, measure up 6 inches from the drip edge,” he said. “Cut a 1-inch slot in the roof deck from 6 inches to 7 inches from the drip edge and put the SmartVent down.”
After installing ice shield over the SmartVent, the starter strip can be installed and the shingles can be applied as usual.
Figure 3
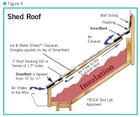
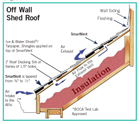
Shed Walls
With a shed wall, siding and windows can pose leak problems and a ridge vent can’t be used for ventilation, but the SmartVent can meet the need for exhaust ventilation at the top of the shed roof as well as intake ventilation at the bottom.“You don’t want to damage the siding, and if a window is sitting on the roofline, you don’t want to risk creating a leak,” said Henderson. The product provides options for the contractor in installation, so it can be installed at the highest possible point. (See Figures 4 and 5.)
The SmartVent has a hinge at the 6-inch mark to allow it to fit in various applications.
“It’s the hinge in the product that is so key,” said Henderson. “That’s what’s so great - the versatility of the product.”
Figure 4
Dormer Peaks
With many houses, especially those that have additions, the back half of the roof can have a much lower pitch than the front side, making the installation of a standard ridge vent difficult or impossible. However, the SmartVent can be used for exhaust ventilation in these cases, said Henderson, and the installation is very similar to a standard ridge vent application. (See Figure 6.)“Often one side of the roof can be raised to a pitch as low as 1:12 or 2:12, but whether you’re covering that section with rubber or asphalt, the low side of the SmartVent can be roofed over or ice shield can be installed over it,” he said. “You can run the rubber roof over the SmartVent to guarantee a watertight roof. It’s a nice, clean look - better than box vents or power fans. And SmartVent is green - it doesn’t use electricity, it takes less labor to install, and it increases energy efficiency, saving customers on their utility bills.”
The vent in this case is single-sided, but it siphons air from both sides of the roof, providing between 12 inches to 15 inches NFA, depending on some variables.
Figure 5
Wide Ridge Beams and Firewalls
Structures with wide ridge beams and cinderblock firewalls can also rule out the use of a standard ridge vent. This is a common situation with condominiums, noted Henderson. “Anytime you have condos, you have to have a firewall,” said Henderson. “If the firewall is installed properly, you won’t get any ventilation from a ridge vent. If you drop a SmartVent down off the peak, each unit will ventilate separately - and properly - while meeting the fire code.”In these cases, the vent should be installed on both sides of the ridge, noted Henderson, who recommends installing the ridge cap and positioning the SmartVent below the top course of shingles. (See Figure 7.) “It should be at the highest point possible for full and continuous exhaust,” he said. “At the eave, it should be installed at the lowest point possible; at the ridge, it should be installed at the highest point possible.”
For more information, visit www.dciproducts.com.
Looking for a reprint of this article?
From high-res PDFs to custom plaques, order your copy today!


