
While the ancient hewn ladder spent thousands of years raising man up, the first stepladder patent was registered by John Balsley in Dayton, Ohio, in 1862. Now the portable ladder had a stable and useful folding counterpart, which also replaced the conventional round rung with a safer and more comfortable stair tread. At the age of 16, Henry Quackenbush of Herkimer, N.Y., patented the first extension ladder, before going on to invent the air rifle and the spring-jointed nutcracker (200 million sold). William Bailis patented the first U.S. ladder scaffold support in 1879, giving the ladder its first horizontal extension. With the advent of the first add-on item for the ladder, the door was open for many more innovations, and they are still being developed today.
According to my research, there are literally thousands of new ideas (or variations of the same) published or patented every year. Fire and rescue services have always led the way in basic ladder innovations, but construction sites have provided the inspiration for many ladder devices. While some of them may prove to have dubious success, there are always a few with a genuine future. It is ultimately up to the ladder owners and ladder users to decide if an aftermarket ladder device has merit. While the free market will always be the ultimate judge, it becomes important to describe and evaluate these products to the segment of ladder users who could best use them. It is in the nature of this disclosure that I have written this series of articles on ladder innovations.
After my articles titled “Ladder Basics” and “Ladder Innovations” were published in November and December of 2005 in Roofing Contractor, some of my readers wrote asking for a more critical, personal evaluation of the ladder devices I highlighted. I believe the “good-better-best” evaluations published in other trade magazines are pretty meaningless in this case, as so many potential uses for the ladder exist throughout the construction trades. The fact that I truly enjoyed working with these devices enough to write about them speaks volumes. My initial qualification and evaluation criteria for a ladder innovation device included:
• Is the device entirely American-made?
• Is the device available anywhere in the United States?
• Is the device reasonably affordable for most roofers?
• Is the device designed to resolve a ladder problem previously unidentified or unsolved?
• Is the device relatively simple to assemble and use?
• Is the device able to take the everyday use and abuse doled out by the average American roofer?
Unless the retail price is obviously out of reach of the average roofing contractor, it will not be discussed at length in my evaluations. Most of these innovations use either metals or petrochemicals, and the prices of these materials are rising astronomically. While everyone is expected to make a profit, those entrepreneurs I spoke with agree that it would take several lifetimes to pay back all of their investments and sacrifices. My opinions expressed here apply only to my own use of the device on any particular day, under site-specific work conditions. With another place, time and crew, an entirely different evaluation could reasonably be made. You may be sure, however, though my opinion is only one in 300 million, you will get it loud and clear.
Anytime you have moving parts and adjustable components on any of the devices mentioned in this article, equipment should be inspected by a competent person before the shift and regularly during the shift for damage, defects and dirt. The root cause of most construction site accidents is that conditions change and no one is designated responsible to notice (observe) and notify (act) accordingly. Always discovered too late in an accident report, the slow deterioration of a piece of equipment is seldom noticed by the crews using it. “When in doubt, check it out. When in doubt, tag it out.”
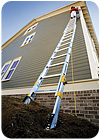
The Equalizer™ ladder from Werner Ladder Co. features a manually telescoping adjustable leg on each side rail and an integrated bubble level.
The Equalizer Ladder
I reviewed the Little Giant™ ladder for my last article. In one sense it was unfair to consider an entire ladder to represent a type of ladder innovation. On the other hand, the Little Giant generated an entirely new class of ladder design, which was rapidly emulated by other manufacturers. I am including the Equalizer™ ladder from Werner Ladder Co. (www.wernerladder.com) in this product review for the same reason, as it may eventually lead the industry down an alternate design path.The Werner Co. was established in 1922 as a floor-covering jobber. In 1941 it began to expand into extruded plastic gizmos for the Navy during WWII. By 1950 the company had grown, and one division in particular began producing rugged, high-quality extruded aluminum ladders. In 1973 Werner was the first manufacturer producing heavy-duty fiberglass ladders using a patented “pultruder” system. Last year Werner began producing the Equalizer extension ladder. The idea behind it is simple: The world is not flat and never has been. Finally, here is a ladder that admits it and gets over it. Built onto the bottom of each side rail is a manually telescoping adjustable leg. While remaining in complete compliance with ANSI A14.2-2000 (American National Standard for Ladders - Metal - Safety Requirements), the Equalizer has forever eliminated the need to dig holes or brick-shim your ladder legs.
It takes only seconds to adjust the ladder to level using the built-in Ever-Level™ System. It is comprised of a bright blue, integrated bubble level built into the first rung of the ladder meant to help in adjusting the ladder side-to-side. One or both legs may be adjusted by means of zinc-plated steel locking pins with detent bails in dual channel holes. They are adjustable in 3⁄8-inch increments up to 81⁄4 inches. The warning decal clearly warns that the Equalizer is never to be used with both legs fully extended in order to achieve additional reach height. (There is always one on the crew.) The Equalizer is made out of aluminum and has adjustable, moving parts. It should be inspected and cleaned by a competent person regularly during each shift. Dirt is the enemy here and may interfere with the proper operation of the tool.
Currently the Equalizer is only available in two aluminum models, but according to Kathy Cianci, marketing manager for Werner, the Equalizer will be available in fiberglass in the near future. The D1700 Series is a Type II (225 pounds) ladder marketed for the nonprofessional, while the D1800 is a Type I (250 pounds) is the ladder intended for the commercial user. The suggested retail price for the 20-foot Type II model is $290.

One or both legs of the Equalizer may be adjusted in 3⁄8-inch increments up to 81⁄4 inches.
• I don’t have to go searching for an add-on leg-adjuster for my ladder anymore. Which truck or gangbox did I leave that thing in? Where was the last place I used it? It is always right on the ladder (where it belongs).
• No more trial-and-error adjustments. I used to have to either walk away to view the ladder for plumb or else depend on a 4-foot level on a slope, which is not always dependable. The bubble level is often adequate to set up the adjustment, or at least minimize the time spent doing so.
• Depending on the soil strength and condition, ladders tend to settle during the work shift. Whenever your ladder is also traversing a slope, controlling the amount of unequal settling is crucial for the climber’s safety. Every time you ascend or descend, the level is visually available to check for any changing conditions.
• Apart from the standard ANSI extension ladder warning/caution labels adhered to the ladder are English/Spanish decals clearly addressing the safe work practices concerning the manufacturer’s recommended adjustment and leveling procedures. As a contractor you should train your employees and evaluate their comprehension of this and all tools before use. Remember that not every employee that speaks a specific language is capable of reading that language. Verify that they understand how safely operate all machinery.
• The Equalizer legs are labeled right (R ) and left (L) in order to ensure that the ladder is properly set up with the wider base section positioned underneath (behind) the narrower fly section for proper operation of the locking mechanisms and leg extensions.
Cons:
• My local soils are very heavy with a high clay content. While the bubble vial is located in the center of the first rung and it is in an unlikely area to step, I noticed that it doesn’t take much mud, snow or combination to obscure the integral level. It cleans off easily with a swipe of a hand, but sooner or later it may be obscured by repeat abrasion. The instruction decal on the ladder clearly states the owner is not to use the level if damaged or broken. Always return the ladder to an authorized Werner dealer for any repairs to the ladder or the Equalizer.
• The mushroom cap, ball-type locking pins are attached inside the ladder rails and through the legs using a 1⁄16-inch diameter by 8-inch long vinyl coated cable secured by means of a crimped swage clamp. Keep an eye on this rig, as it wouldn’t take much to lose a locking pin on a rough-and-tumble work site. No pin, no ladder.
• The rung with the level is 15 inches long, while the ladder may extend to as much as 32 feet. In my opinion, this 25:1 ratio would reduce the variable accuracy of the level and necessitate further verification of plumb before climbing. It’s always a good idea anyway to look over any ladder for orientation and condition before access. The warning decal clearly states that the bubble level indicator is for “reference only” and requires the use of “good judgment” to determine if the ladder is level (plumb).
• While the added weight of the Equalizer legs is negligible, they do add 3 inches total to the overall width of the ladder rails. I have custom, fold-down ladder racks on my vehicle, and if I didn’t want to extend the ladder over the rear bumper, I had to make minor adjustments to the support arms and security clamps for this additional width. No real problem, but something to think about.
This is not really a complaint, but why not install another pair of levels on the outside of the rails about 5 feet from the bottom? These could be factory-set to read level when he ladder is properly inclined to a 4:1 rise/run (75 degrees). The typical 4:1 graphic is useful but is often ignored by the worker setting up the ladder. And a bubble is a universal indicator of safe and level in any language. In fact, that’s what makes the Equalizer such an appealing product.
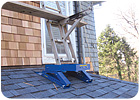
The Gable Master secures ladders on top of pitched roofs. Keep in mind that a compliant installation of the Gable Master as photographed here would have required the use of a either a scaffold or ladder (if the roof was not accessed) or a personal fall arrest system (if the installer climbed onto the roof).
The Gable Master
The Gable Master™ from Roof Mates (www.roofmates.com) is a true “niche tool” if I’ve ever seen one. You probably won’t carry this item to work in your pickup every day, but the day when you absolutely need one, you will thank yourself if you have one hanging up in the shop. Hands-down, this device wins the gold medal for problem solving. There is nothing else in the market today that addresses the problem of 180-degree ladder installation from one roof pitch up to another eave above, let alone at the 90-degree perpendicular angle. Robert and Michel Garrett, inventors of this device in 2001, have over 27 years of roofing experience with AOK Roofing Co. in Severn, Maryland. Apparently they had one too many of these roof-to-roof jobs and just weren’t going to take it anymore.The final solution they came up with is as straightforward as it gets. They built a 24-inch by 24-inch steel platform adjustable to any pitch between 3:12 to 18:12 with pockets into which the ladder feet or pump jack poles may be placed and securely bolted into position in all four compass directions. The device can be adjusted to fit roof truss/rafter layouts of 2 feet, 18 inches and 16 inches on-center. As far as the ladder or pole knows, it is set up on level grade and its feet cannot kick out. The suggested retail price is $299. Combine this tool with the Ladder Stability Anchor™ (reviewed below) attached to the fascia or the eave above, and you’ve got a portable ladder every bit as secure as any fixed ladder.
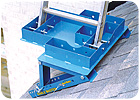
The Gable Master™ from Roof Mates is a 24-inch by 24-inch steel platform that adjusts to any pitch between 3:12 to 18:12. It has pockets that lock ladder feet or pump jack posts in place.
• It just works. Anyway you look at it, it completely accomplishes everything it claims. Many scaffold manufacturers provide an adjustable leg with a pivoting base plate, which can be attached to a roof pitch to anchor their welded-frame scaffolds on a roof, but I have yet to see one for a pump jack post. While I didn’t have the opportunity to set up pump jack posts in the Gable Master’s post pocket, I can readily understand how simple siding a high vertical wall over a pitched roof could become using this device. I have many tools that I tend to use infrequently but cannot do without (i.e., the right-angle drill). The Gable Master fits securely in that category.
• The cost of the Gable Master is just under $300, so it is reasonably affordable for those who need to stage a load on an incline. When you think about the labor typically spent to set up some jury-rigged platform to hold either a ladder or pump jack, you may realize that the device may pay for itself in just a few jobs. Now that I own one, I am not sure how I got along without it.
Cons:
• The doggone thing weighs 28 pounds. It’s made out of sheet steel, after all. The first trick was to get it up and over the eave and onto the roof deck by myself. Carrying that much bulky weight up a ladder was prohibitive in compliance with Subpart X. Hoisting it clear of the eave (perhaps already shingled) was equally difficult without some sort of off-set, scaffold davit and well wheel. As I was at the eave on an 8:12 pitch, I was 100 percent tied off in a personal fall arrest system, but not restrained securely enough to balance comfortably at the drip edge to clear the device around it. I just turned 60, but I got it up by using a haul line. You might disregard my complaint about the unit’s weight if you’re 25 years old and have good upper body strength - but beware. Using your back like a crane to hoist heavy loads at full arm’s reach can ergonomically debilitate anyone at any time. We tend to abuse our spinal column without any payments due until we near retirement age.
• My next problem was manipulating something that heavy and that large on a steep roof deck by myself. It’s bound to be a little hard to handle, considering the job it was designed to do. It hadn’t gotten any lighter after wrestling it up to the roof. I could have used a set of glove-comfortable handles welded to each side of the platform. The steeper the roof pitch, the more difficult it is to hold it in the precise position required for installation while fastening its nailing tabs. Thanks to my Cougar Paw™ boots (www.cougarpaws.com), another product I’ve reviewed in the past, my feet were “welded” to the roof - otherwise it would have been twice the work (and fall risk). Temporarily placing some sort of gripping material (like the Cougar Paws CPKB Kneeling Board) underneath the support pads could be a simple solution to hold the unit steady during placement You wouldn’t want to completely let go of this unit until it was secured.
As a word of caution, I would remind users of the Gable Master to pay particular attention to how and where your fasten the unit to the roof deck. Double-check your fasteners, above and below deck. Did you screw/nail directly into the rafter/truss below, or did you miss it entirely? I often drill a pilot hole for any rafter attachments. When the layout is “blind” (underneath felt or shingles), I make sure my attachments are centered by actually nailing 12d sinker above the shingle line to one side of the rafter/truss until it’s located. Assume nothing.
In conclusion, it is a rugged device for a rugged solution to a knotty problem. As a rescue trainer for the building trades, it is a great tool to have on hand in a roofer’s post-arrested-fall (PAF) scenario. There are many cases where the PAF victim will be attached to his harness from a lanyard/lifeline over the eave of one roof, suspended helpless above the pitched deck of a lower roof. Training rescue personnel to accomplish a safe, ladder-assisted, pick-off rescue would be impossible without a device such as the Gable Master ladder platform. Did I mention that there doesn’t seem to be another such device in the marketplace?

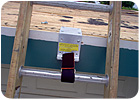
The Ladder Stability Anchor comes in three forms each to fit different application settings. The mobile anchor pictured here is designed to be used with fascia or rafter anchor points from 1⁄2 inch to 21⁄2 inches thick.
The Ladder Stability Anchor
Once I saddled up my first ladder installation with the Ladder Stability Anchor™ I was sold. The Ladder Stability Anchor (www.ladderstabilityanchor.com) is a ladder solution developed by Ken Smith of A-OK Roofing to establish both temporary and permanent ladder stations for roofers and carpenters alike. It has received praise and approval from Farmer’s Insurance, which recommends its use for all of the company’s adjusters performing roof inspections. The primary anchoring device includes a temporary subfascia clamp constructed of 1⁄4-inch high strength aluminum with a 4-inch clam plate secured by a threaded T-screw. It may be attached to either the fascia or a rafter, from 1⁄2-inch to 27⁄8-inches thick. The LSA comes equipped with four lengths of 2-inch wide poly web stability belts (16 inches, 24 inches, 36 inches and 48 inches) with Velcro hook material on one side and loop on the other.The first step is to install a short stability belt around the double rungs at the ladder’s midsection next the ladder locks. This prevents any potential release of mid locks. On one end of a longer stability strap is an attached nickel-plated swivel hook, which snaps into the eye plate of the secured anchor. The stability belt is centered on the ladder and run underneath and over the closest ladder rung. Returning back to the anchor, the strap is passed down through the buckle at the clip and drawn hand-tight. The remaining length of belt is attached by Velcro to the bottom of the strap loop, thereby stabilizing the ladder laterally and reducing the chance of the bottom kicking out. You just pinch the belts together to ensure the Velcro surfaces are fully engaged. The whole operation can take less than two minutes to complete - valuable time to ensure your ladder’s stability.
The suggested retail price for the LSA is $99, and it comes with a flat roof plate or a closed eave plate. These may be temporarily or permanently screw-attached to either the top of the roof deck/parapet or else to a wall surface, enabling future ladder anchorage without delay. Smith adamantly encourages his roofing contractors to promote permanent LSA installations on all commercial and many residential roofs. Whether the contractor and property owner choose to leave the anchor permanently in place or not, it can easily be removed and re-installed when necessary. The manufacturer also provides an optional Gutter Block (sold separately) to stand off the ladder attached the LSA, preventing the load from crushing the gutter.
One version of the Ladder Stability Anchor is designed for flat roofs. The residential plate has a 2-inch face and the commercial plate has a 4-inch face. The manufacturer recommends leaving them on the site after the job is completed as a permanent anchor for ladder access.
• It’s really simple to install, but so is the guy I told to hold my ladder. However, it’s stronger than the guy pretending to hold the bottom of your ladder (and nobody wants to hold the top of your ladder). The product works all the time and is never distracted, and I can’t say that about the guy holding my ladder.
• The variety of stability belt lengths available (they are now available in standard sizes up to 72 inches long, with custom sizes available) gives the user a multitude of locations where the LSA may be utilized. I have built many passive solar houses here in the Northeast with nonstandard soffit overhangs. This makes the longer belts much more practical when attaching the ladder to a permanent anchor plate on the wall above the frieze board.
• A roofing contractor should emphasize the importance of establishing permanent ladder access points to the homeowner. Permanent wall anchors could be attached for any future ladder uses either by the homeowner or another contractor.
• The flat roof parapet anchor plate is a perfect device not only for roofing, but also for contractors looking for a way to attach a ladder to any interior/exterior structure inside of a commercial or industrial facility. As a rescue instructor for Rescue Training International, I am encouraging the use of this device in all practical ladder rescues to secure the additional combined weight of rescuer and victim. Any redundant “bombproof” anchorage is always encouraged during a rescue operation.
Cons:
• The manufacturer provides this warning for users: “Replace your stability Velcro bests when Velcro does not lock like it used to.” This is a somewhat vague statement intended for a decision-making criteria for hazard controls. There should be some simple test procedure (with a minimum safety factor of two times) written in a performance language, which could easily be performed by the user to determine when to take a stability belt out of service. A performance procedure as simple as “Grasp the end of the belt with thumb and forefinger and gently lift. Velcro which separates easily indicates excessive wear and requires replacement” would suffice.
• I found that when I attached the clamp underneath a rafter tail, the threading and securing of the stability straps where they impinged underneath the subfascia took some getting used to. Even if the strap slack could not be entirely eliminated under these conditions, the ladder was considerably stable than before it was anchored.
• I discovered a problem this winter which could affect the safe work practices of the LSA. While my ladder was anchored under the eave of my galvanized roof, a small amount of frost melt-off landed on the stability belt and rapidly refroze. This made the Velcro hard to remove and could potentially damage some of the “hook-and-eye” attachments if someone tried to remove the frozen strap. I finally applied two thermo-chemical, pocket hand warmers on either side of the straps to melt the frozen Velcro without damaging it. I then hung the straps to dry with my socks above the stove and they worked as designed the rest of the day. We all know that winter construction is always a difficult, slow and expensive venture, so why should it be any different with a ladder safety device? I recommend purchasing extra stability belts of various lengths to keep in reserve in any case.
One of the first thoughts many of us have when encountering a new product is, “I could make that myself.” In this case, I wondered what kind of results I could get by simply purchasing a heavy-duty C-clamp at the hardware store and attaching an industrial nylon/Velcro strap from a sporting goods store. So, I tried it. The end result of my $20 purchases was better than nothing but certainly far less than I expected. I’d just as soon purchase a Ladder Stabilty Anchor and avoid any substandard quality issues and any associated personal liabilities.
Next month’s article will include reviews of more ladder innovations, including the Ladder Max™ (www.buy-laddermax.com), the Portable Tether™/Ladder Roof Anchor™ from Level Rite (www.levelrite.net) and the SmartLadder™, a device still in the research and development stage.


Report Abusive Comment